Milk Stools
Every one has a story.
Milk Stool #3
Milk Stool #3:
Okay, now that I've done two of these, everything should be easy. Right?
Yes and no. Each piece presents challenges. Some of these I make for myself both in the desire to try new techniques and in my choice of raw materials.
For the next milk stool I looked around my shop and spotted a piece of Red Oak that had been 'cured' for a long time. This board was either from Roland's garage in River Falls or from the shed at the farm in Centuria. Both would have originated in trees harvested from the Baker Sawmill 54825 but this were far older than any of my former stock.
Then I needed some Black Walnut. My stock of this is getting pretty thin so I looked in my woodpile and found some pieces that came from a tree trimming outfit here in Madison. I have no idea of the origin other than that. It has been curing on my pile for a few years and has avoided the furnace each of those winters.
"To practice any art, no matter how well or badly, is a way to make your soul grow. So do it!"; Kurt Vonnegut.

Source wood for MS3
July 2016
Here is the end of the Red Oak board that I used for MS#3. You can see the weathering on the surface which leads me to believe it has been stored outside for some of it's life (perhaps after I got it). I had to avoid some minor checking when I cut the pieces, but it was pretty straight -- thought it had a slight warp (you'll see this later).
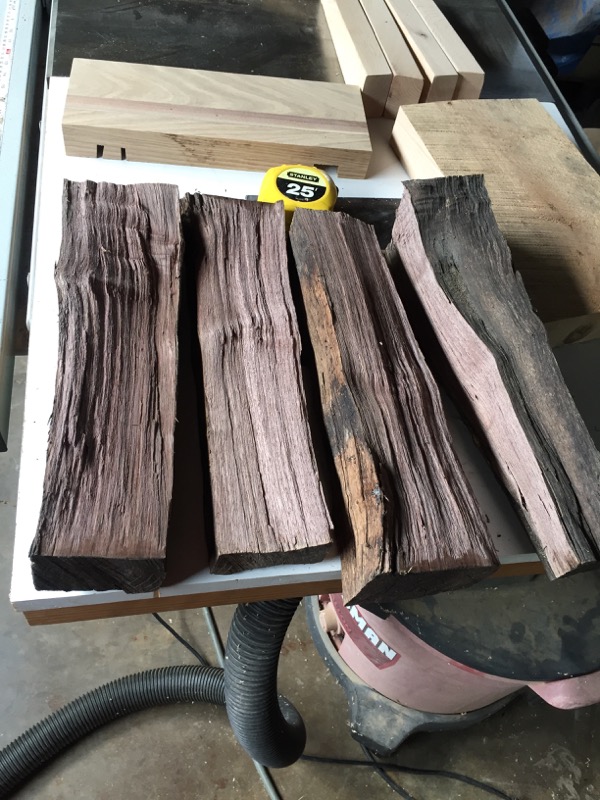
Black Walnut source wood
Here is the source for the Black Walnut strip. This particular tree had wood with a nice deep reddish brown color. This has caused me to set it aside each winter when I'm bringing in the wood for our heater.
I square it up on my table saw -- I don't have a band saw. This works pretty well with a sharp blade and much carefulness. I'm limited to 3 - 1/3 inch thickness (for the most part) but that's plenty for these small stools.
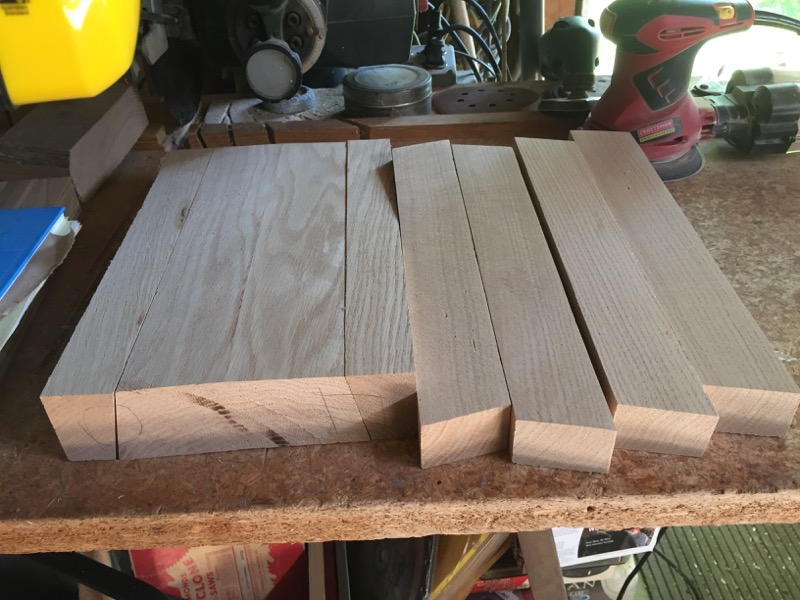
all the pieces
Here are all the pieces for stool #3 ready for making the dado cut in the top center piece. This is a little different from the previous stools in that the edge pieces were not ripped from the one piece. Since the source board was only 4ish inches wide I needed to take the legs from another slice. I cut matching angles in the center piece and the edge pieces to make the complete top.
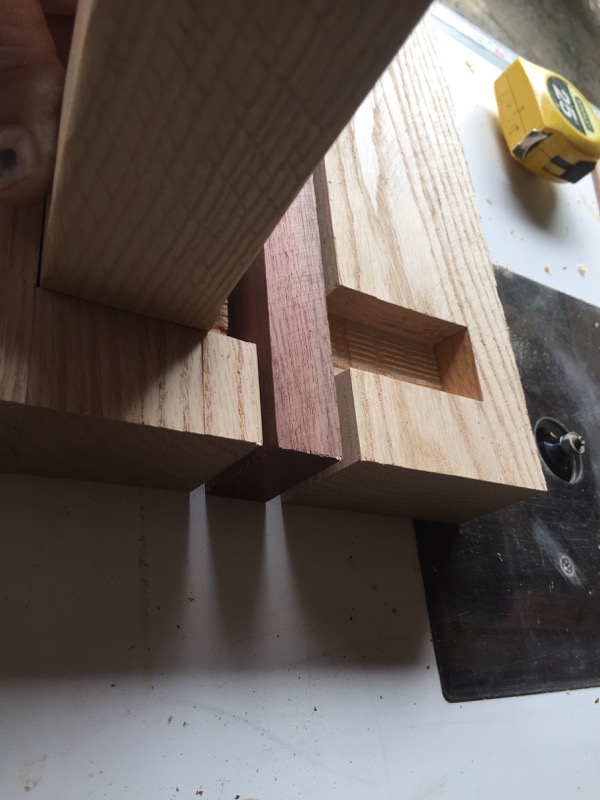
I cut the dados in this center piece.

Top ready for sanding (??)
All pieces are glued together and ready for sanding.
Or not?

warp
i said earlier that there was a little warping in this wood. I try to straighten this up (square it up) when I saw off the surface. Since I don't have a band saw or a planner I have to do this square up on the table saw. This works fine for pieces less than 3.5 inches. This board was over four inches.
I tried -- and was nearly successful -- in running it through the saw one way and flipping it over and doing another pass to finish the cut, but as you can see in this picture the result wasn't perfect.
I could use the hand plane to flatten this (i've seen this done by good woodworkers but I'm not that good). Or I could rip it down the middle and square up the two halves.

Rip it
Rip it i did. Now I could pass it through the table saw and get all the edges perfectly square with matching thickness all around.
walnut strip
Before gluing it back together I reflect on two things. This top is borderline too narrow. Wouldn't it be nice to have some Walnut in this stool?
But as you see there's a rub. This walnut strip doesn't have the dado's cut. Should try to cut dado's in this strip and hope they match the oak pieces?
No, I'll add the walnut strip and deal with the dado's later.
I have an idea.....

apply glue
Glue the pieces together.
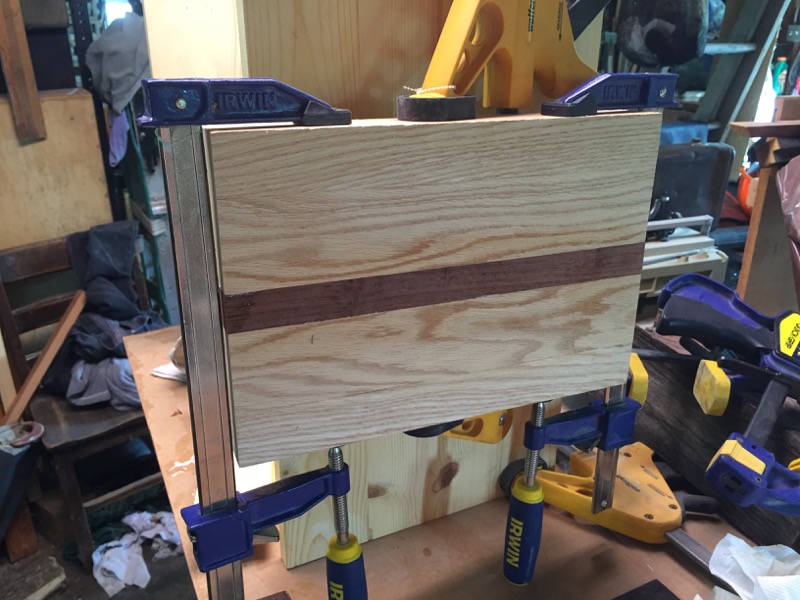
Clamping
Clamping these pieces is much easier than clamping the edges to the center since in this case all pieces are cut at 90 degrees. Only ordinary care to prevent sliding when clamping is required and everything lines up perfectly. .

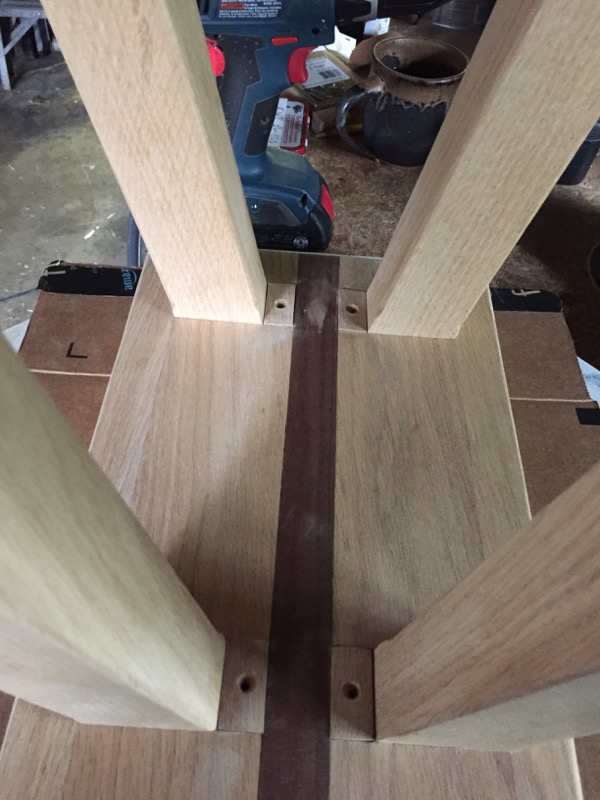
Ready for wedges
Instead of two wedges to secure the legs, this stool will require four. .

wedges
These smaller wedges are a little tricky to cut. I formed them as far as possible as large as possible. I made as many angled cuts as possible on long stock wth table saw and then cut to length with chop saw..
Ready for glue
Wedges are made and precisely fitted. Screw holes are boared with countersink. Stool is ready for glue.

Clamping
As I said earlier, each stool I try to improve both the design and the process. A friend asked how I get all the legs even so it doesn't wobble. This is easy in the 8-legged stool because all the leg assemblies are identical and they are mounted perpendicular to the top. If they are the same length before assembly they will be the same length after. With these stools it's much more complicated. I'll be honest in saying that even though I re-cut the leg tops to accurate width there is still a good deal of wiggle room.
My friend suggested clamping between a sort of fixture. This would make sure the legs were positioned correctly AND insure that they were even and the stool would stand solidly on the floor.
Before glueing, I made a test clamp to see where the legs should be - to be flat and square. I then drew a square on the board -- making sure it was perfectly square -- as a guide for the final positioning of the legs. I flipped it over and re-assembled it with glue and screws. I placed the clamps and flipped it back on it's feet to make the adjustments and firm up the clamps.

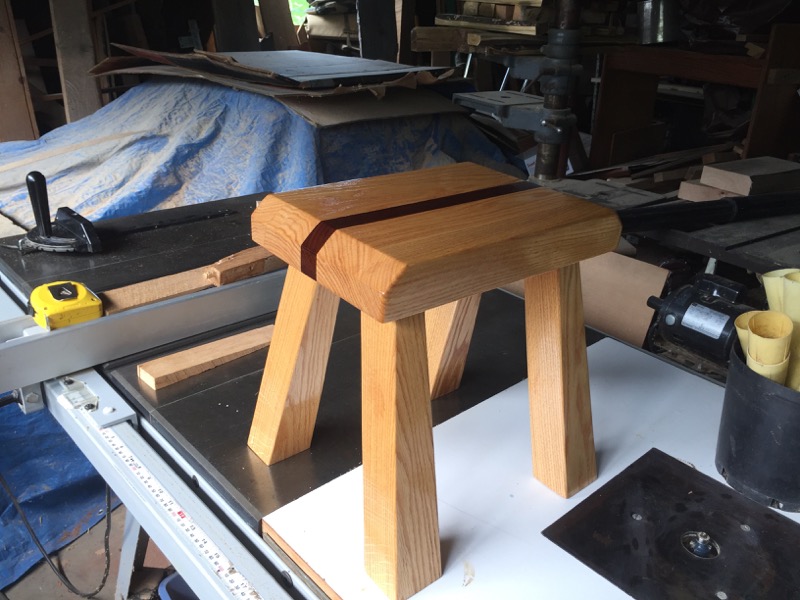
finished and signed
Milk Stool finished and signed.
Each time I tackle a new project, I try to make it interresting to me -- and anyone else who cares. I think about the design and once I have that in mind, I think about the materials I will use. I look around my shop for wood that will fit the project as well (and maybe more important) wood that is interresting.
For this stool I selected some "old" wood that I'd pretty much given up on. I'd only kept it around in case I needed to make some plant stakes or something. I'd assumed that since it was weathered and old that it wouldn't look nice. But then I took a closer look and here is the result.
Compare this to the first picture of the 'raw' board. I think that's pretty cool. Don't you?